Whole House Eco-Retrofit
Whole House Eco-Retrofit
In CAT’s Zero Carbon Britain report, we promote a mass retrofit of all existing buildings, to greatly reduce heating demand. Renewable energy can then meet our heating needs as well as the energy demand of electricity use, transport, and industry.
We target a 50% reduction in heating demand in the Zero Carbon Britain scenario. This is the average reduction, and will involve a mix of measures for new and existing buildings. For some homes we can do much better, but some will be more difficult to retrofit to a high standard.
Why an Eco Retrofit?
Reducing energy use within a building is of course the main focus of a retrofit project. However, there are also energy and pollution impacts during the extraction and processing of materials, and at their eventual disposal. Natural fibre materials have a lower impact in manufacture than synthetic ones, and are easier to recycle. Using natural building materials therefore makes sense as part of a really low impact eco retrofit.
Materials made from natural fibres also offer the important additional benefit of ‘carbon sequestration’. This is because the growing plants absorbed carbon from the atmosphere, and this carbon then stays locked up for decades.
Another benefit of natural materials is their breathability, which affects how they deal with moisture. It’s particularly important in older buildings, because they were designed to be open to absorbing and releasing moisture. Sealing an old house up with cement render and nonbreathable insulation tends to cause damp problems. Using natural materials therefore helps to protect buildings from damage as well as leading to a low environmental impact.
See our low energy buildings and natural building materials pages for more on embodied energy, life-cycle impacts, and breathability.
Why a Whole House Retrofit?
You may cause problems if you take energy efficiency measures one by one without attention to how they’ll interact. For example, adding better glazing and draught-proofing can increase damp problems if you haven’t provided suitable ventilation.
The ‘whole house retrofit’ approach is intended to avoid these pitfalls. Someone looks carefully at all aspects of insulation, draught-proofing, ventilation and heating to create a structured plan. Such a retrofit is a big job, and you can treat it like a new build. This means engaging a specialist architect or retrofit expert to oversee the project and tailor the plan to your home. The details will be different for each house. However, looking at houses in rows or blocks together makes measures like external insulation easier and more cost-effective.
At the moment, the cost of a whole house retrofit can look daunting. We do need a nationwide scheme to make the financing easier, perhaps with zero interest loans. In some places there are local projects starting up – see the links below.
Can I retrofit my home in stages?
If you can’t do a retrofit in one go, do still plan it with the whole house in mind. Consider carefully how insulation, draught-proofing, ventilation and heating will interact with each other and with the building fabric. Take time first to understand the possible risks and how to avoid these or monitor them. This will help you choose materials, plan how one stage will lead to the next, and set priorities.
It’s useful to get a really good survey first, to give you a good understanding of what you’re starting with. This will help you to allocate your budget to where it will have most benefit, and to set targets. You could make use of tools such as a thermal imaging camera and a door blower test.
A retrofit survey will be more expensive than a standard Energy Performance Certificate (EPC) survey, which are very cheap. A decent retrofit survey might cost a few hundred pounds. You may pay more for an airtightness test or thermal imaging survey for a more detailed assessment.
A full retrofit plan, used to guide contractors on the work to be carried out, could then cost a few hundred more. Having a good plan is important for being able to clearly communicate with contractors and suppliers. Make your targets clear, so that they know exactly what you want to achieve and how you’ll measure it.
What are the key retrofit measures?
When allocating your retrofit budget, concentrate first on the building fabric, which means improving insulation, airtightness, and ventilation. This includes addressing the risks from cold bridging and thermal bypass, and how to prevent summer overheating.
If you don’t get insulation detailing right, you can still have high heat loss from ‘cold bridges’ or ‘thermal bypass’. This is likely to lead to condensation, which over time will cause damp problems. See our other pages and related questions for more on insulation techniques and materials.
Airtightness is key, and it’s not just about doors and windows, but all edges and corners where materials join. There are many areas to address: where joists penetrate a wall, holes for pipes & cables, and so on. People sometimes associate airtightness with being stuffy. But the key is that airtightness must work together with suitable ventilation. In a home with excellent airtightness you’re able to control ventilation properly, and get fresh air to where you need it. People in very airtight homes (such as a Passivhaus) have found that their air quality actually improves.
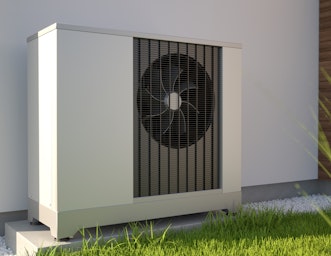
You can ‘futureproof’ by planning for later stages, such as changing your heating system. When improving the building fabric, think about the plumbing needed to prepare for a heat pump, biomass boiler, or solar water heating. For example the size & shape of radiators, and space for an appropriate type of hot water cylinder.
Generating your own electricity, such as with solar PV, may not be integral to a retrofit. However, if retrofit measures entail re-roofing, then they may be an opportunity for integrating PV if you have the budget.
Where can I find retrofit professionals?
The AECB promotes sustainable building and retrofit, and their member listings can be filtered for graduates from their Carbonlite retrofit training. Or see the Passivhaus Trust (with EnerPHit for retrofits). Another listing site for green builders is the Green Register. In Scotland, another link for finding professionals is the Scottish Ecological Design Association.
The Government’s TrustMark scheme now covers professionals that carry out energy efficiency work including retrofits. It’s being linked to a new standard – PAS 2035: Specification for the Energy Retrofit of Domestic Buildings. There’s more about this standard on the Retrofit Academy site.
Dedicated Retrofit Advice Schemes
There are various local schemes around the UK offering retrofit surveys and plans:
- People Powered Retrofit or Your Home Better (both Greater Manchester)
- Futureproof (parts of the West of England)
- Ecofurb London
- Cosy Homes Oxfordshire
- Cartrefi Clyd (Parts of Wales)
- Future Ready Homes (Shropshire and Herefordshire)
- Furbnow (currently West and East Midlands, London, Essex, the North East)
- EcoCosi from Changeworks (Edinburgh)
- NESFIT (North-East Scotland)
Some of those above may expand into wider areas as they grow. Do also check if your local authority has any retrofit support in place or planned.
Energiesprong uses an industrialised model to minimise costs. Buildings are measured and bespoke insulating panels for walls & roof are manufactured offsite. They’re concentrating on houses with simple shapes (blocks or terraces) – generally through housing associations and local authorities.
Funding for insulation improvements
To find out more about other funding that you may be able to claim for energy saving measures, check with your local authority. At the moment, support is usually for households on low incomes or those claiming certain government benefits, but it is being expanded to more people in April 2023. Some support comes through the ECO scheme (‘Energy Company Obligation’) and some is from government funding, delivered by local schemes.
In England there’s support for households with a gross annual income less than about £30,000 who own or privately rent a house with an Energy Performance Certificate (EPC) rating of D or worse. If you need to check your home’s EPC, use the government’s online EPC register. The ‘Sustainable Warmth‘ programme combines the Local Authority Delivery Phase 3 (LAD3) funding for homes with mains gas and the Home Upgrade Grant (HUG) for those without. The names of local schemes vary, so ask your local authority about the funding.
In Wales ask Nyth/Nest scheme (0808 808 2244) or Warm Wales about energy grants for households. North of the border, Home Energy Scotland (0808 808 2282) provide interest-free loans with additional cashback offers across a range of energy saving and renewable energy measures. In Northern Ireland ask NI Energy Advice (0800 111 4455).
Further Information
For older buildings – generally built over 100 years ago, with solid walls and breathable materials – more care is needed when renovating. The Sustainable Traditional Buildings Alliance (STBA) promotes the sustainable refurbishment & protection of traditional buildings. See also the information, briefings and advice notes published by the Society for the Protection of Ancient Buildings (SPAB) and by Historic England.
CAT offers many short courses, including our long-running eco-refurbishment course and others on natural materials. See this blog post about eco-refurbishments by our course tutor, Nick Parsons. We also sell some books in our online ecostore.
Related Questions
What is breathability?This can be a confusing term for two reasons. Firstly because it refers to moisture not air and secondly because the exact physical processes which go on in a building are complicated (and still being researched). However the metaphor of breathing captures the important idea of continual movement. Moisture in itself might not matter, as long as it doesn’t take up permanent residence in your walls.
Broadly, breathability is the ability to buffer moisture – to soak it up and then release it – thus avoiding a situation where water vapour is retained by the fabric of a building. The technical term for this property is hygroscopic. Natural materials tend to be more hygroscopic than synthetic ones. The term “vapour permeable” also gets used in this context, referring to materials that allow water vapour to pass through at a certain rate.
A breathable construction will be made up of a gradation of vapour permeable materials, with the materials towards the inside being less vapour permeable than the materials towards the outside. A rule of thumb is that the material on the inside (warm side) should have five times the vapour resistance of the material on the outside (cold side). Without using a very high resistance material such as polyethylene or foil-backed board, this can be achieved with a suitable vapour-check layer on the warm side of the insulation. This layer slows down the passage of moisture to a safe level.
The construction also needs to be airtight on the inside to ensure the vapour-check layer works as intended. So it’s important to not put gaps in the vapour check layer for services (wires, etc), and instead have a thin space for these services between the vapour check and the internal finish (e.g. plasterboard). The final layer of external cladding might be waterproof (such as tiles) but there must be a ventilated gap between this and the sheathing board that actually completes the breathable construction.
In a UK-type climate the interior of a house usually has a higher relative humidity (RH) than the outside because it contains people exhaling, cooking, and washing. It’s a very general rule that, left to themselves, things will always migrate from an area of higher concentration to one of lower concentration, so there will be movement of water vapour towards the outside (or, to be more technical, the interior has a higher vapour pressure).
At times of high interior RH, water vapour will enter the walls, lowering the RH (both high and low RH cause problems and the ideal range is 40-60%). At times of lower interior RH, almost all of the water vapour will migrate back into the interior to be taken away by air currents. Any water vapour that might have managed to penetrate the wall deeply will be drawn out towards the exterior because of the lower permeability of the outer layers, so no harm done. Any water coming in from the outside will be unable to get very far as it is pushing through layers of decreasing permeability. The breathability of materials interacts with both temperature (which affects RH) and ventilation (one of whose functions is to carry away water vapour).
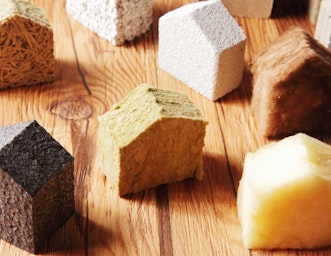
There are basically three different types of insulation material:
- Organic – those derived from natural vegetation or similar renewable sources, which tend to require a low energy use in manufacture (a low ‘embodied energy’). Examples are sheep’s wool, cellulose, cork, wood fibre, and hemp.
- Inorganic – derived from naturally occurring minerals which are non-renewable but plentiful at source. Likely to have a higher embodied energy than organic materials. Examples are mineral/glass fibre, perlite and vermiculite (from volcanic rock) and rigid foamed glass.
- Fossil organic – derived by chemical processes from fossilised vegetation (oil) – a finite resource. Fossil organic insulation materials such as expanded polystyrene and polyisocyanurate or phenolic foam are highly processed, resulting in a high embodied energy.
Which is best?
If possible it is better to choose insulation materials that have not been heavily processed as this will reduce the carbon footprint and environmental impact of your home. But it is far better to install cheaper inorganic or fossil organic materials with the right physical properties and a low thermal conductivity than to install nothing at all.
In many cases, organic insulation material can be applied instead of inorganic or fossil organic, but there are exceptions. For example, there is not an organic insulation material suitable for cavity wall insulation.
Think also about the ease of installation. Loose fill insulation is quick to put in in lofts, but cannot be DIY installed in anything other than a flat place. Rigid boards and batts will come in certain sizes, but need to be cut to shape if you have some unusual spaces. Some materials can be cut with a knife, but a few will need a saw. Some mineral wool now comes in a thin foil or plastic wrap, to protect from the fibres. You should still wear a face mask when installing any type of installation, as small fibres of any kind are best not inhaled.
The first two of the following four methods involve adding insulation to the outside of the roof, so will be suitable if there is little headroom underneath, or if access is difficult. The second two involve adding insulation underneath the roof. If insulating on top of a flat roof, make sure that it still drains well so that water does not pool on top.
Upside Down or Inverted Roof
An ‘upside down’ roof uses waterproof insulation on the outside of the building structure. The insulation is laid over the existing waterproof membrane and held down with something – which could be pebbles, turf (for a green roof), paving slabs, etc. Suitable insulation materials will tend to be a bit more expensive, and include cork, foamed glass and closed-cell plastic foam. You’ll need to check that the structure can bear the weight of the insulation and finish. This option keeps the existing membrane, but there is a risk that water will percolate through the insulation and so cool down the roof deck – causing condensation.
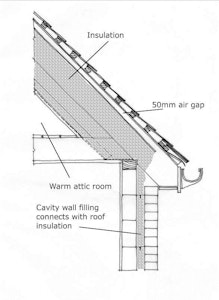
Warm Roof
A warm roof will have the insulation laid over a vapour control layer (itself over the roof deck), with a membrane laid over the insulation and suitable finish on top. You’ll need to check that the structure can bear the weight of the insulation and finish. If you are replacing the roof membrane anyway, then this will be a better solution than the ‘upside down’ roof (above), as it will keep water above the insulation and so keep the roof decking warm. You could still keep the existing membrane underneath the insulation if it would be difficult to remove.
Cold Roof
The insulation is put between the roof joists. A ventilated gap needs to be retained between the top of the insulation and the roof decking, to avoid condensation build-up. It can be difficult to get adequate ventilation, so this method is often not recommended.
Internal Insulation
A method similar to dry-lining of walls can be used, with a plasterboard/insulation board added to the underside of the internal roof, below the joists.
A ‘cold loft’ roof, with the insulation at ceiling level (laid flat in the floor of the loft) is generally the most economical, and easy to install. However, if you want to insulate in the slope of a roof in order to make use of the space, then here are some tips.
The most economical way of achieving a good thickness of insulation in the roof slope is to have two layers of timber, one supporting the roof finish and another supporting the insulation and ceiling finish. Batts or loose fill insulation is generally better between rafters, because it will give a tight fit. Otherwise rigid material has to be very precisely cut to fit well.
To reduce cold-bridging, timber I-Beams or I-Joists can be used when adding new beams or building a new home.
In an existing roof (with rafters supported on roof beams), the second layer of timbers (ceiling joists) can be hung off the rafters using hardboard, ply or timber ‘hangers’, or nailed crosswise to them, or they can span between the roof beams. This technique can also be used with flat roofs.
An air space of 50mm must be left between the insulation and the tiling felt, unless the felt is of a low-vapour resistance type. If using a breathable membrane, with insulation up against it, then above the membrane you would put counter battens (top to bottom) as well as the standard battens (side to side), for adequate ventilation beneath the tiles. Sometimes, a breathable membrane is used with only standard battens, with the membrane slightly draped between rafters to allow ventilation – in this case an air gap of about 25 mm would be needed between membrane and insulation.
Thin wood-fibre boards (22 or 35mm thick) can be used as an alternative to a membrane under tiles. When re-roofing, the fibre-board is laid over the rafters, and then counter battens (in line with rafters), and then standard battens to fix the tiles/slates to. Thicker wood fibre boards can also be used, to give more insulation and achieve a lower U-value (to minimise heat loss).
A ‘warm roof’ will have waterproof insulation on the outside of the structure (so the main timbers are on the warm side of the insulation). It’s a useful way of upgrading an existing roof when internal room height is at a premium. On a sloping roof, the tiling battens are supported by rigid insulation and fixed through to the rafters by special screwnail fixings. The insulation must be waterproof, such as cork, foamed glass or closed-cell plastic foam board – these will tend to be more expensive than the standard insulation materials for internal use.
You can also read more at the webpage of the Energy Saving Trust, on Greenspec’s pages about ventilated and unventilated roof insulation options, and in a guide from Historic England.
Traditionally, solid floors were laid directly onto soil. This relies on the ground underneath being kept dry, usually by it being higher than the ground outside the building, and by having adequate drainage.
The most common method now used is to have a thick concrete slab laid on a damp-proof course (e.g. a polythene membrane). A layer of polystyrene insulation is then finished with sand/cement screed and tiles or board.
For a low-impact alternative to the above you could look into using recycled aggregate in the concrete (rather then newly quarried material), and perhaps using stabilised earth as the screed. You could also consider using recycled polythene or bitumen for the damp-proof course.
A solid floor of stabilised earth or limecrete should have a solid insulation material below it, such as cork, perlite or foamed glass, with recycled polythene vapour check and damp-proof membrane (DPM) below this.
Try to achieve at least 150mm of insulation for a solid floor. Insulation should be placed around the edge of the floor, and the floor finish supported on some sort of rigid insulation. Possible materials include cork, perlite (volcanic glass), lightweight expanded clay aggregate (‘Leca’), foamed glass (slabs or granules), fibreboard, mineral wool boards, or plastic foam of some sort. A vapour check layer will normally be required to prevent condensation occurring within the insulation layer.
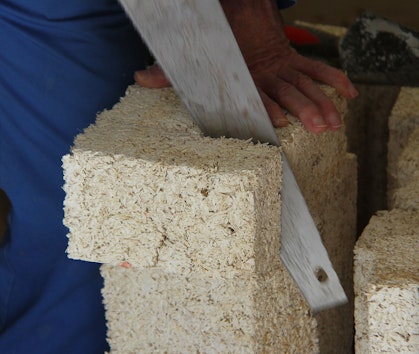
Another possibility is a hemp & lime (or ‘hempcrete’) floor. Lime has a much lower environmental impact than cement, so if you can use it place of cement in mortars or concrete you will be reducing the ’embodied energy’ of the floor and the carbon emissions from construction. The hemp provides the insulation. See for example the details of how we insulated the WISE building at CAT.
If you are redoing a floor, then you may have the chance to consider underfloor heating. Because it runs at a much lower temperature than standard radiators, wet underfloor heating is more efficient and provides a more comfortable type of heat. It’s particularly appropriate for use with heat pumps, as these need to supply low-temperature water to run efficiently.
You can also see some information and examples on the Energy Saving Trust and Historic England websites.
If you can access the floor from below via an unheated cellar or basement it will be easier, otherwise you’ll have to lift the floorboards (which requires care to avoid damaging them).
225mm of a renewable or mineral fibre type of insulation is a decent amount. Make sure you keep good ventilation to the underfloor space beneath the insulation – with vents at either side for air flow.
Batts or loose fill insulation is generally better between joists because it will give a tight fit. Otherwise rigid material has to be very precisely cut to fit well.
Renewable insulation will need to be protected by a breathable membrane to protect it – if the floorboards are not well sealed. See the website of the supplier of insulation you’re using (or call their advice line) for advice on the type of membrane that would be needed. Natural insulation materials include hemp, sheeps wool, recycled textiles, recycled paper (loose fill), and wood fibre.
Loose fill insulation can be carried between the joists on a membrane or netting nailed to floor joists or on a low-vapour resistance board (for example softboard, a fibreboard bonded by heat rather than glues – this is good for Warmcel insulation made from recycled newspaper).
For other insulation materials (e.g. standard mineral fibre types) it will be worth looking on the website of the manufacturer as they’ll usually have guidance sheets on how the material should be installed and what limitations there may be.
You can also see some information and examples on the Energy Saving Trust and Historic England websites.
If you have cavity walls and they haven’t been insulated, up to a third of the heat produced in your home could be escaping. Insulation should reduce your heating costs and carbon emissions from your home significantly. The insulation itself needs to be suitable for the conditions inside a masonry cavity, and so choices are limited to three options: blown mineral wool, plastic beads or plastic foam.
Cavity wall insulation should cost only a few hundred pounds and recoup this installation cost within 3 or 4 years. With gas-fired heating, you’ll reduce annual carbon emissions by almost half a tonne per year. This makes it several times better than installing a solar PV roof in terms of both carbon savings per pound spent and payback time. Both costs and savings will be higher for a detached house.
The installation process must include an assessment to ensure that the construction is of a suitable type. Installers should work through an accredited scheme and guarantee the installation for 25 years. It may take about 3 hours to inject the insulating material into the cavity. For installers, see the Cavity Insulation Guarantee Agency (CIGA), National Insulation Association, or British Board of Agrément.
Some homes may be classified as ‘hard to fill’ cavities – perhaps too narrow or uneven to fill easily. Insulation may then be more expensive to install (perhaps 2 to 3 times as much), or it may not be feasible – external or internal insulation may then be better.
A Which? Magazine survey in 2011 found that some installers were not undertaking adequate assessments. According to industry guidelines, they should inspect all external walls thoroughly to check for cracks/defects, check all internal walls to check for any existing damp, and do a cavity check (with a drill hole) on all walls. A proper survey like this is likely to take an hour. Do ask a few companies around to give quotes.
Cavity wall insulation should not cause problems of dampness, but a proper assessment of the property is needed to ensure it would be suitable. If your home is towards the west coast of the UK, more prone to wind-driven rain, then it might be unsuitable for cavity insulation if it’s in a very exposed, unsheltered position and there are cracks in the external wall. For those few homes in this position, measures could taken to prevent damp risks – for example by putting extra protection in the form of boards or tiles on the exposed walls. There will be a cost to this of course, and it should be compared with quotes for options such as internal or external wall insulation.
BRE (Building Research Establishment) research in the 1990s showed that cavity wall insulation when assessed & installed properly does not lead to an increased risk of damp. The study found that the structural condition of the walls was the most important factor in damp problems – for example, badly filled mortar joints or ‘dirty cavities’ (where, during construction, mortar has dropped down inside the cavity – i.e. if too much is used). Over time, this can cause problems with damp-proofing.
Condensation is due to excessive moisture, cold conditions, cold surfaces or inadequate ventilation. It can cause mould, heat loss and building damage. To address these issues, the room should be properly insulated and adequately heated (to keep the surfaces warm).
So do take all feasible insulation and draught-proofing options, and look into improving single glazing with either replacement glazing or with secondary glazing (a cheaper option).
Condensation may still occur on replacement windows, as they’ll still be the coolest surface. New windows will be more airtight than old ones, so warm moist air will be no longer be escaping through cracks in the frame and around the seals. This means that existing damp issues may become more pronounced. Many windows will include trickle vents in the frame, to allow a small amount of ventilation, but to keep the house warm and dry you may need to take a few other measures to avoid producing lots of moist air.
Drying clothes indoors can easily cause problems of damp and condensation, leading perhaps to mould, etc. So if you need to dry indoors, it should be in a room that can be shut off and ventilated (perhaps with heat recovery, as mentioned below).
The bathroom and kitchen in particular should be able to be ventilated in a controllable way, to stop moist air circulating into the rest of the house. For example, after a shower or bath, leave the bathroom door shut and the window open for a while until moist air & condensation on the window/mirror has cleared. Do the same when cooking if you can; if your home has an open plan layout at least stop the moist air circulation where possible (e.g. to the upstairs rooms).
To avoid heat loss from a room like a kitchen or bathroom, where lots of moist air is regularly produced, you could consider a heat recovery extractor fan. It may be worth getting a slightly bigger heat-recovery fan unit than you need, as they can be a bit noisy if they are operating on full power. This may be fine if are just switching it on for a short while to clear the bathroom, but it could be obtrusive in the kitchen. If a fan unit is not supplied with more solid covers over the plastic slatting, it could be worth fitting something if you live in a house that is a bit exposed to the wind (as they could let in draughts when not in use). An openable wooden casing could be fitted quite easily.
If drying clothes indoors is not an issue, and you’re already careful about venting away moisture from bathroom & kitchen, then excessive condensation may be from some other cause, such as a water leak somewhere (e.g. from a pipe under the floor or in the loft), or water penetrating the structure from outside (such as rainwater coming in cracks in masonry, or if gutters are broken). If problems persist, it would be worth investigating these issues, as over time they’ll cause damage to the building.
The U-value is a measure of how many watts (representing the rate of flow of energy) pass through one square metre (m²) of a construction detail (such as a wall) for every degree difference in temperature between the inside and the outside. Temperature is measured in kelvin, and 1K = 1°C (degree centigrade).
As an example, a U-value of 6.0W/m²K for a single glazed window means that six watts will be escaping through each square metre of glass when the temperature difference is one degree. If it is 20°C in the house and 0°C outside, then the heat loss is 20 x 6 = 120 watts per square metre.
U-values are generally used to describe the thermal performance (heat loss) for a section of construction that involves several materials – such as a wall made up of timber, insulation, board & render.
Thermal conductivity
For individual materials, such as a type of insulation, you’ll come across the term ‘thermal conductivity’, also known as a k-value or λ-value (lambda). This is the rate at which heat flows through a particular material, and good insulation will have a low thermal conductivity. It is measured in watts (heat flow) per metre (depth of material) per degree difference (inside to outside), so the unit is W/mK.
Most natural insulation materials (hemp, wool, recycled paper or textile) will have a thermal conductivity of about 0.035 to 0.040 W/mK, which is similar to the performance of conventional mineral wool insulation. Foil-backed plastic foam insulation boards are slightly better, with thermal conductivity about 0.023 W/mK. So about 100mm of the plastic foam board will give equivalent insulation value to about 150mm of the various woolly types.
A damp proof course (DPC) is a layer of material between the foundation and the rest of the building which prevents water from getting into the building fabric. Traditionally these were two overlapped layers of slate or lead, but some old buildings do not have them at all. Modern buildings tend to use DPCs based on bitumen or polythene (perhaps recycled plastic), and they’re standard and cheap to fit at the construction stage. For a timber frame building with minimal foundation you will only need a small amount of DPC material. A DPC is important for this type of construction because timber can soak up moisture and will rot if not able to dry out easily.
Do I need to add a damp proof course to my old house?
There is a concern that you must fit a DPC to satisfy your mortgage company. However, many won’t actually insist on this for an older property if there’s no evidence of a damp problem. There are several possible causes of damp and if you can identify the cause and solve it, perhaps with some feedback from a professional, this is often enough.
‘Rising damp’ is often just a catch-all term for damp issues that could be solved in other ways. Whereas retrofitting a chemical DPC can turn out to be a waste of money, quite apart from the environmental impact of the chemicals. If it doesn’t solve the problem you may find that you’re not covered by the guarantee. A subsequent drill test which shows that there’s no ‘rising damp’ could be taken to indicate that the DPC worked and you just have a different problem – despite this other problem probably being the case all along!
So what should I do?
First check your roof, gutters, pointing and ground levels (or get a professional to do this). Drainage around a building is important. If possible, dig out anywhere where the ground level is higher outside than in. In some cases, digging down 200-300mm and putting in stones or gravel will help drainage around the site. Fixing these problems will cure most damp problems.
Another possible cause of damp is condensation, which generally occurs on the coldest surfaces. This can be lower down walls, so looking like ‘rising damp’. To address condensation your home needs to have adequate insulation, heating and ventilation. See our information pages on these topics for more advice.
If walls have been affected by long term damp, then even when the problem has been solved it will usually involve re-plastering internally. This is because the original plasterwork will be affected by hygroscopic salts, which could result in continued damp problems. A building may take a year to dry out.
What if there are still damp problems?
There can be a problem if a DPC has been bridged – for example with render. Water can potentially move up the render where it can’t move up the brickwork or masonry. This could also cause problems with frost damage. A DPC must extend through the full thickness of the wall, including pointing, rendering or other facing materials.
When retro-fitting a DPC in an older property make sure that any original lime-based plaster or render that was removed gets replaced with the same sort of material. Lime-based materials are breathable and flexible, unlike strong cement renders. The latter can cause serious cracking problems where the old plaster meets the new.
To accurately test for moisture a company would need to do proper testing, such as a drill test (possibly time consuming and costly), rather than just using a damp meter. If you’re convinced you have rising damp then get a proper drill test done by an independent local surveyor.
Further information is available in this article on the misdiagnosis of rising damp and solutions to damp problems, written by Tim Hutton. See also Abbey Independent Surveys and Mike Parrett, who has investigated thousands of buildings without finding rising damp. In every case, damp was attributable to something else.

WANT TO LEARN MORE?
Come on one of our practical eco-renovation short courses.

Did you know we are a Charity?
If you have found our Free Information Service useful, why not read more about ways you can support CAT, or make a donation.
Email Sign Up
Keep up to date with all the latest activities, events and online resources by signing up to our emails and following us on social media. And if you'd like to get involved and support our work, we'd love to welcome you as a CAT member.
Follow us


